Tuesday 27 September 2011

Yellowdock - 1, 2, 3

In our mission to get the raspberry red that some online soapers have been getting with yellowdock root, we have tried three times.
Our first attempt was a half pound batch with yellowdock infused coconut oil as 10% of the total oils. The infusion steeped for 1 week and was not very strong. The result was a very light raspberry pink soap with a slight orangey brown discoloration in the center (the discoloration is not really visible in the picture). It was disappointing at first but after curing for a while the soap has evened out and become consistently light pink throughout.
This is what it looked like:


This is what it looks like now:

Our second attempt was another half pound batch with 0.5 tsp of yellowdock powder added at trace. The result was nowhere near what we were looking for. The top of the soap was pinkish while the inside had that same orangey brown discoloration. It has been curing for about a week and a half now and the color seems to be evening out as well.
This is what it looked like when it gelled:

This is what it looked like right after cutting:


This is what it looks like now after about 10 days of curing:


For our third attempt we went into overdrive with the yellowdock oil. We made a new infusion with 10 oz of coconut oil and 1 oz of yellowdock powder. We let this steep for just over 2 weeks until the oil was so dark that you could no longer see through it. We then used the infusion as 30% of our half pound batch and these are the results:
This is what it looked like right after pouring:


This is what it lookd like right after cutting:


This is what it looked like today after washing the ash away:


Not sure how went from pink to a tomato carrot orange but the disappointing truth is that we were again, unsuccessful. It has not had a chance to cure now but maybe it will mellow away from orange after a while.

Monday 19 September 2011

Alkanet and Fading

There has been some talk about Alkanet Root and Ratan Jot fading significantly over time when used in soap. We have only used it once before and we actually kept a bar from that batch to see how it would look later. It has probably been about 3 or 4 years since we made this soap (at the beginning of our adventure). Our notes are nowhere to be found so we can't be 100% sure what we actually did but if memory serves us right, here is a summary:

The color oil was made by heat infusion on the stove for 30 to 60 minutes with about 1 tablespoon of alkanet root and a few large scoops of coconut oil.

The alkanet that we used was obviously very old (though we did not know it at the time) because it barely colored the oil. If you look at the picture of our color oil (which we also kept from that day) and compare it to the Alkanet oil we have infusing right now there is a huge difference. The Alkanet oil we have now has the same rich color that the Ratan Jot infusion did...there is a picture of that oil in "Spicy Color Trials Part 2" (Remember those are the same thing but from different suppliers).


We did cold process soap but the recipe is lost. All we know is that it had some coconut oil, olive oil and probably something else...

Here is a picture of the soap:


This has not faded as much as you might think. It is much lighter than the purple soap we made with the Ratan Jot but when we first made it, it was not much darker than the picture shows. You can still see some light purple coloring to it.

We stored it in a cardboard box in a basement. It was not on display and it was never used.

We plan to keep one bar each of our colour trial soap and after a significant amout of time, we will post pictures so that everyone can see how much they fade.

Rhubarb Experiment

After reading online about rhubarb root being able colour soap anywhere from pink to red, we thought we would see how actual rhubarb fared.  We weren’t able to find any information online about this so we thought we’d show you what we did so you can AVOID doing this in your own soap making adventures.
We cut a ‘bushel’ (is that what you would call it?) of Rhubarb from our mom’s garden, cut it up, boiled it, strained it, then reduced and concentrated it. Our intention was to use the liquid in place of water for a regular soap recipe. This is what the liquid looked like:
Now, we didn’t just rush into this blind, we actually did a test before starting the recipe.  To test the colour, we mixed 1 cup of water with a teaspoon of lye. We then added a spoonful of the rhubarb liquid to see what color it would become. To our surprise, it turned green! (Sorry, no picture)
When we went to mix the lye into the rhubarb liquid for our soap recipe, the liquid turned green at first…THEN it turned puke brown orange.  It smelled terrible, the lye would not dissolve and passersby may have been able to hear gagging noises outside. Basically, the lye burned the rhubarb liquid into oblivion.
Here is a picture:
Perhaps adding the rhubarb liquid to the soap at trace or freezing it and keeping the mixing bowl in an ice bath would prevent it from burning. Maybe we will try that another day.

Thursday 15 September 2011

Ratan Jot Blue?

After making soap with Ratan Jot we realized that it behaves the same way that Alkanet does. It smells the same and they’re the same color before soaping and after. Wonder why that is? Well, Ratan Jot and Alkanet are the exact same thing! And here we thought we were being smart, comparing the way they react in soap and remarking on how similar they are.

Minor intelligence lapse aside,

Many soapers online talk about using alkanet for blue but the only color we’ve ever been able to get is purple. So, we decided to do an experiment to see where this blue is coming from.  In the beginning, with our limited soap knowledge, we thought that the heat produced by the soap might be affecting the resulting color. Now we know better; it’s the PH that affects the colors.
Before we get to the experiment, here is some background about soap PH. When making soap, we mix lye with oil. Lye and oil react to create soap. If you have less lye than is required for your recipe, you will have extra un-saponified oils in your soap. This makes it mild and conditioning. If you have more lye than is needed in your recipe, you will have extra lye hanging around which makes for a very harsh soap. For the purpose of this experiment, we made one batch with more lye than required (-5%), one with 5% more oil than required and one with 15% more oil.
Our predictions:
The lye heavy batch will be blue, the 5% batch will be light purple, and the 15% batch will be purple.
We had a newbie soaper for this round, take a look at her excellent soapy work:
Here are the oils before mixing, they are clear purple:

This picture shows one of the batches while it was being mixed. All three batches were the same color during mixing. The only difference was that the lye heavy batch traced much faster than the others.

This is a picture of the soap right after it was cut. The top layer is the -5%, the middle is the 5% and the bottom is the 15%. If you look closely, you can see that the center of the top layer is creamy dark yellow but the outside is blue.  
Here is the soap the day after cutting. The top layer started to turn fully blue a few minutes  after hitting the air. This picture shows the completely blue layer. (There is parchment paper between each layer)
Our conclusions:
If you get blue from using Alkanet or Ratan Jot, it is because the soap is lye heavy. Likely, soap coloured blue with Ratan Jot is going to be very harsh on your skin.

Monday 5 September 2011

Spicy Color Trials! Part 2

In our post about infusing spices in coconut oil we mentioned that we would be updating you on how the soap turned out. Well, last night we made 8 half pound test batches and we have lots of pictures to show you. Yes, we only told you about 4 of the colors we were planning to try but since then some things changed. For one, the madder root did not leave any color in the oil so we left that one out and we added 5 others.

Method:

Each color infusion was used at a rate of 10% of the total oils in the recipe.
Oil and lye solution was mixed together at 125 degrees F
Once moulds were full they were insulated and placed in the oven.

Let’s start with the yellows:

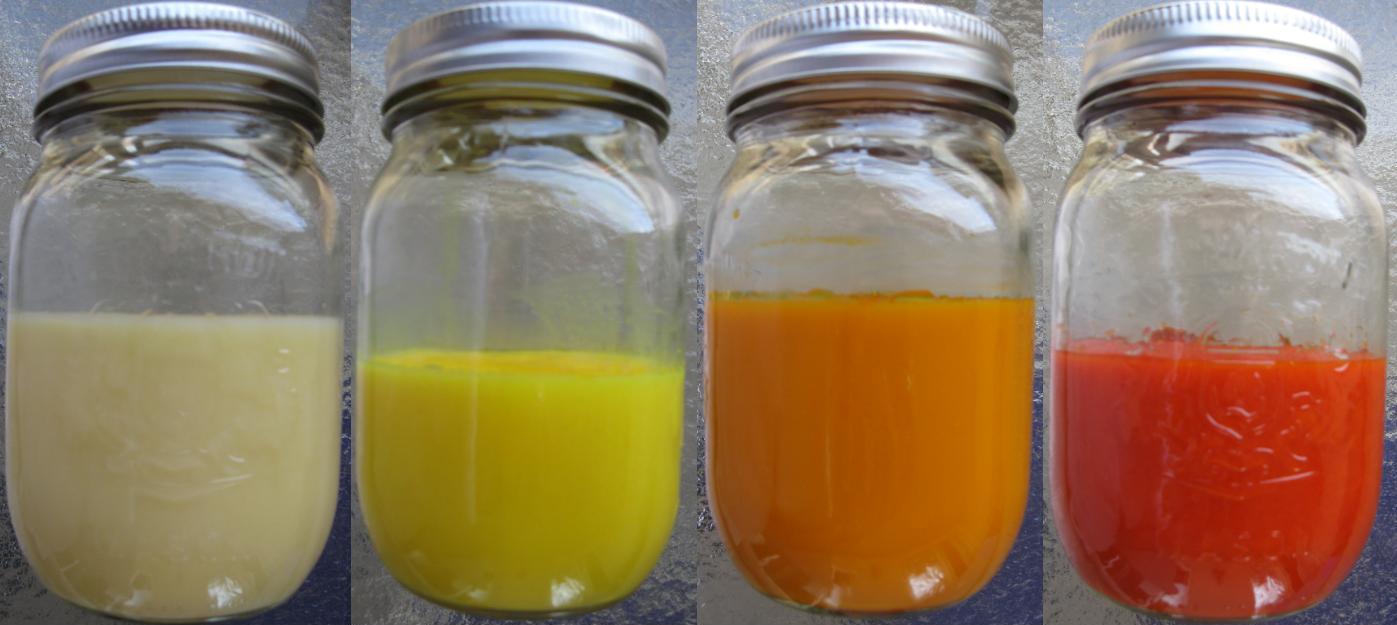
The oils below were strained through coffee filters before use. Calendula and Annatto were steeped for 1 week. Paprika and Turmeric were steeped for 2 weeks.

Left to Right - Calendula-Turmeric-Annatto-Paprika

This is what they looked like once we poured them into the moulds. We made each batch one at a time so the batch on the left is freshly poured while the rest had already been sitting for a bit.

Left to Right - Calendula-Turmeric-Annatto-Paprika

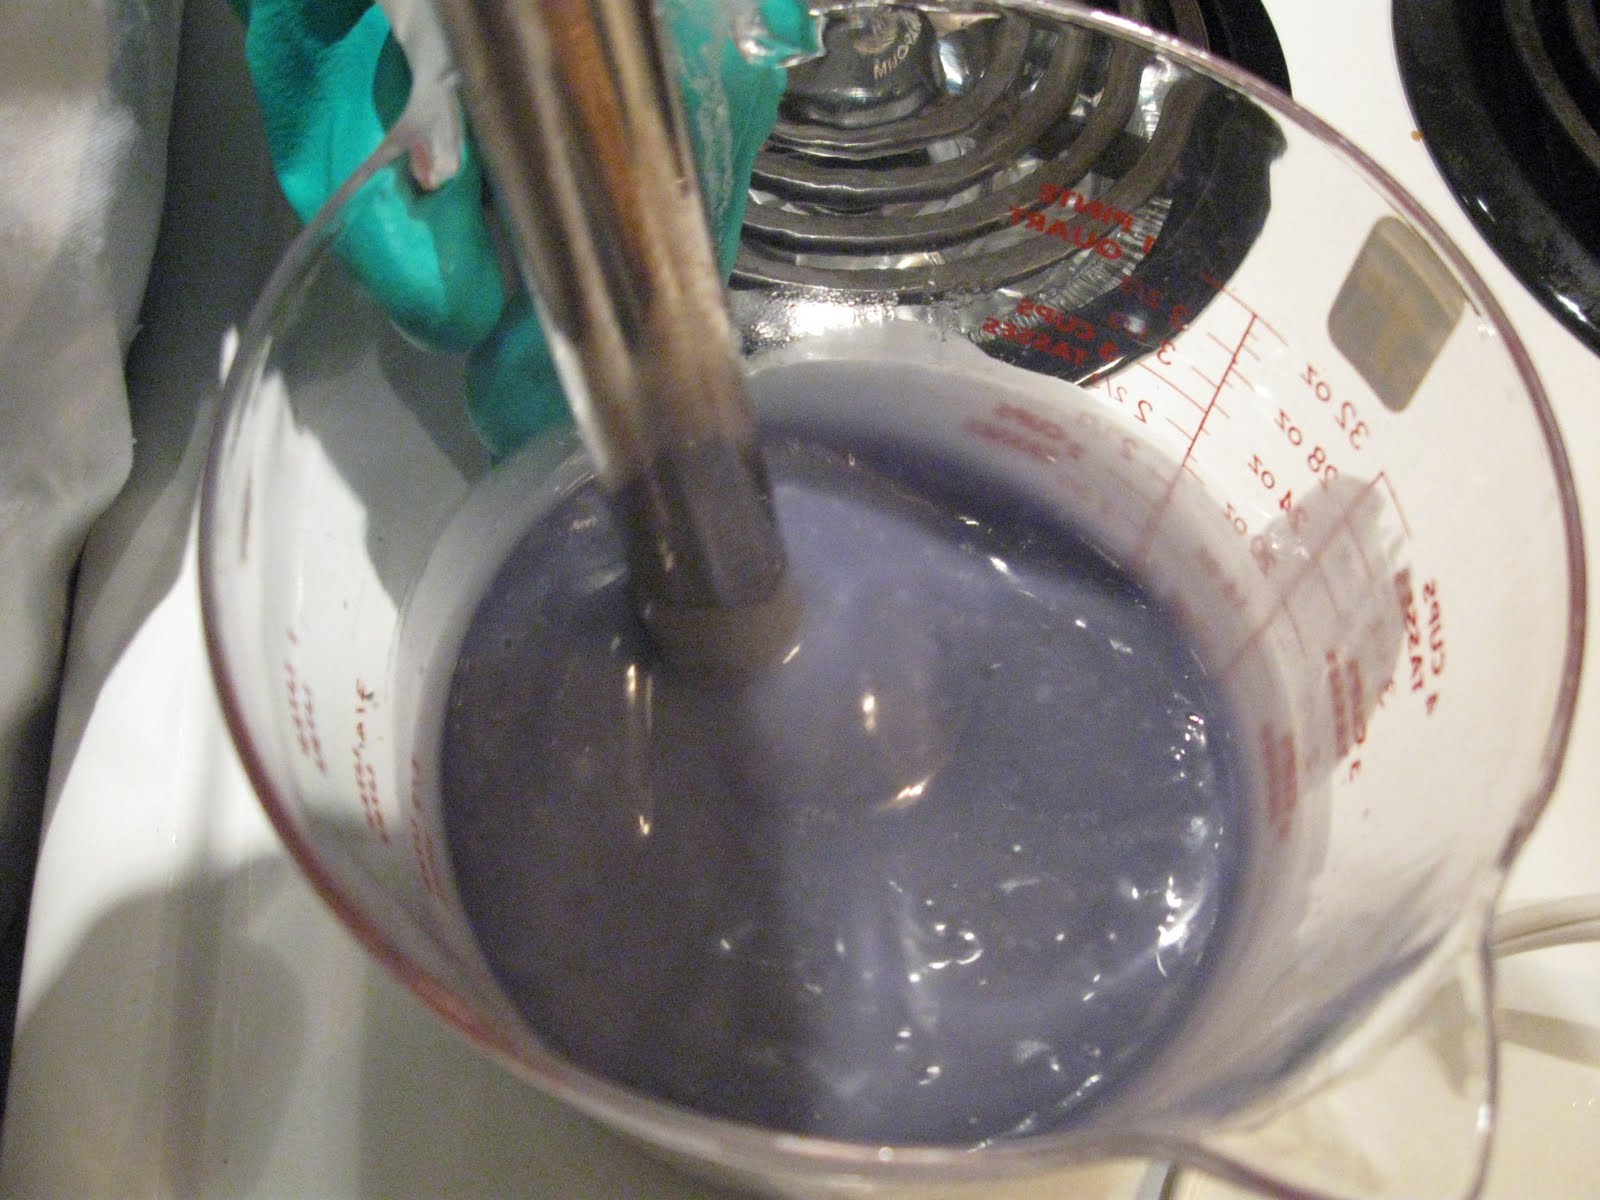
This is what they looked like while they were gelling. You can see what we meant by translucent in my post about the gel stage in this picture.

Left to Right - Calendula-Turmeric-Annatto-Paprika

And here is the soap fresh from the mould after sitting over night in the oven.

Left to Right - Calendula-Turmeric-Annatto-Paprika

Here is the soap cut into bars:

Paprika

One of us......ahem.....(the one not typing this blog)....forgot to add the castor oil to the recipe so this one is a bit crumbly looking. The color looks a lot like orange creamsicle. It won’t be used though because with the missing oil it will be very lye heavy.


Annatto Seed Powder

This one, predictably, looked like cheese. Did you know that Annatto is used to color cheddar cheese? (Yes, it is spelled wrong in the picture)


Turmeric

We thought this one would be a brighter yellow. The bar on the bottom is closer to what the color actually looks like. The camera used to take the pictures does not want to capture the color very accurately. (Ok, Turmeric is spelled wrong too)


Calendula Petals

Where is the color you say? That's right, it’s not there....no color showed through at all on this one. Calendula petals are usually put right into the soap for colour...they stay yellow after coming into contact with the lye. We wanted to see if calendula infused in oil would leave any color...it did not.


Ok, on to the purples.

These oils were also strained through coffee filters before use. Ratan Jot steeped for 2 weeks. The yellow dock root and the rosehips steeped for 1 week. The item on the right is dragon's blood resin, crushed into a powder. We added 0.10 oz of that to the half pound batch while mixing.

Left to Right - Ratan Jot-Yellow Dock Root-Rosehips-Dragon’s  Blood Resin

Here are the purples after pouring. The dragon’s blood resin soap on the right is freshly poured in this picture while the ratan jot, yellow dock and rosehip soap has been sitting for a while. You can see that the gel process has already started in those.

Left to Right - Ratan Jot-Yellow Dock Root-Rosehips-Dragon’s  Blood Resin

We had a bit of a volcano with the ratan jot. One of us......ahem.....me this time, turned the oven on to warm it up a bit and forgot to turn it off. The soap got too hot and the ratan jot started to volcano.


Here are the purples fresh from the mould.

Left to Right - Ratan Jot-Yellow Dock Root - Rosehips - Dragon’s Blood Resin

And here are the cut purples.

Dragon’s Blood Resin (Daemonorops Draco)

The dragon’s blood turned out better than we expected. It looks more orange in this picture but the actual soap is a light brown orange with flecks of what looks like dried reddish blood. Sounds kind of gross when I describe it but it actually looks nice.


Rosehips

As predicted, the rosehips did not change the color at all. When held side by side, the rosehip soap and the calendula soap are identical. We had our doubts but we wanted to see if the rosehips would be pink like some soapers online say they will be. We plan to try putting rosehip powder right into the soap next time. 
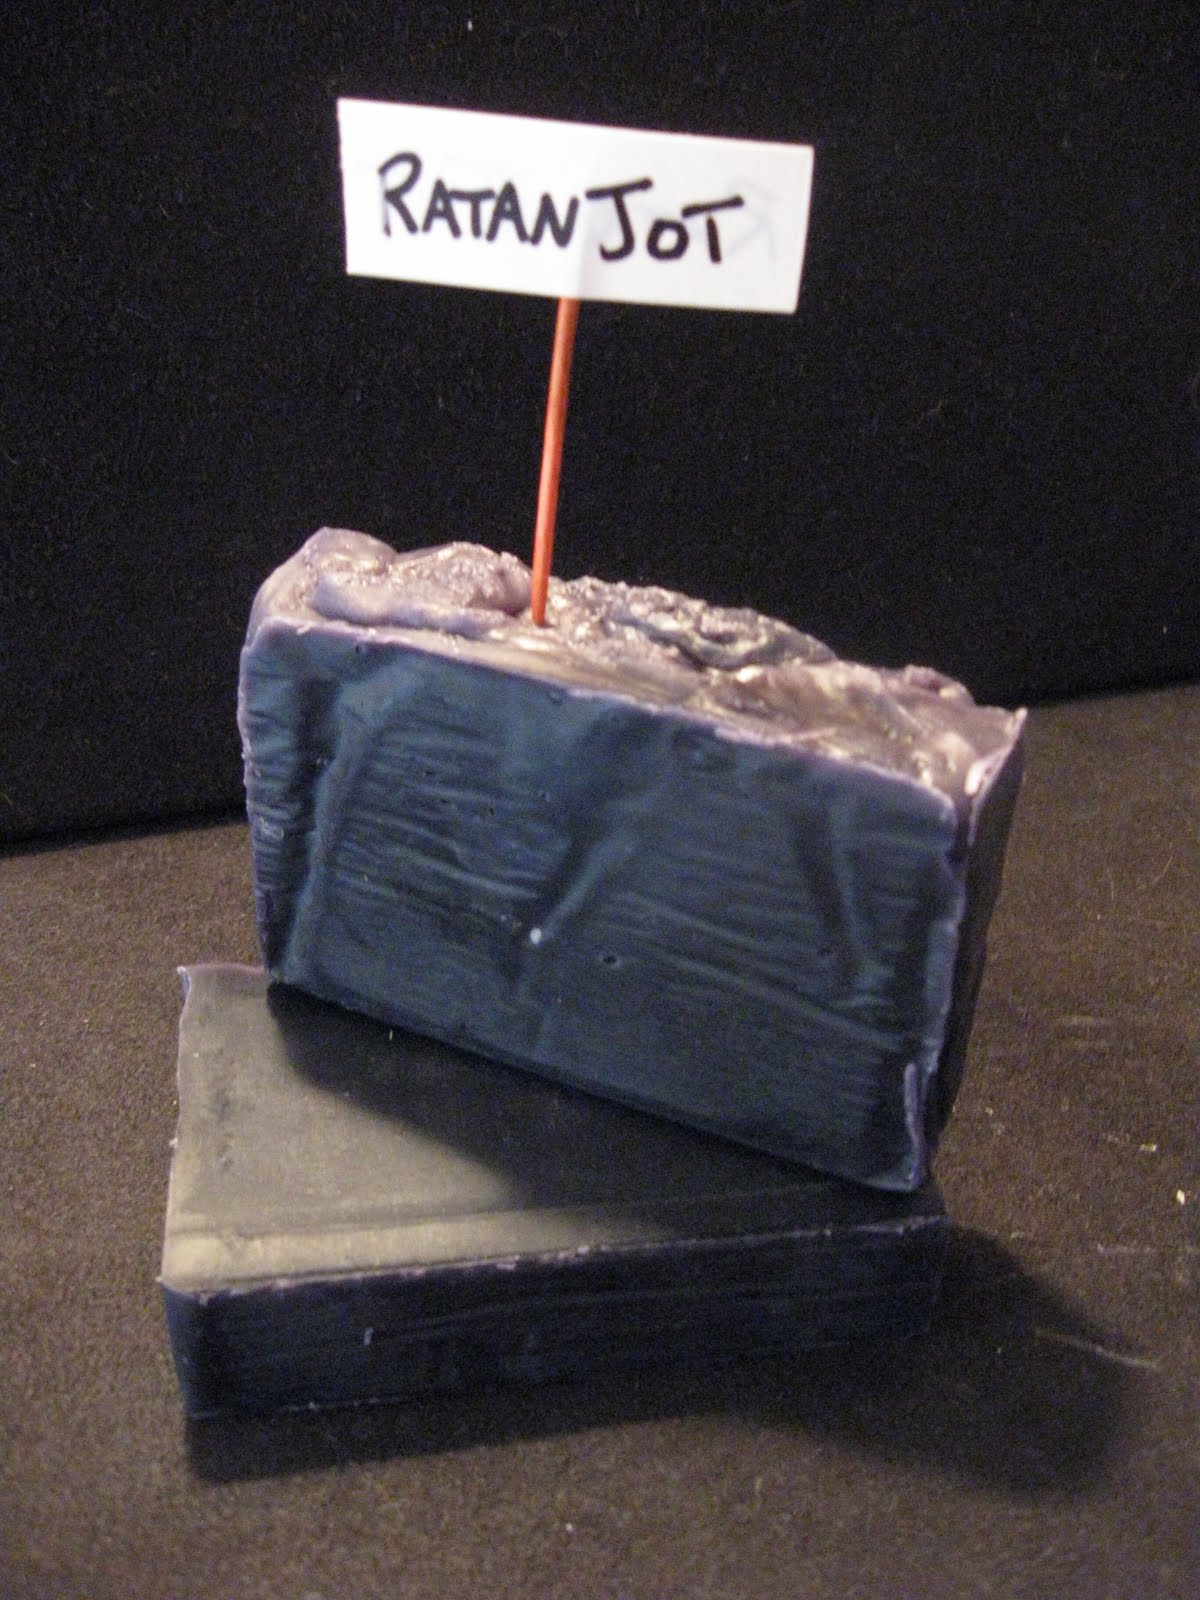

Ratan Jot Powder

This soap was very exciting when we made it. It started out as a bright vibrant blue and turned to this nice dark grey purple. The Ratan Jot behaves similar to Alkanet Root, which we have tried before but this turned out much darker. We want to try using less of the Ratan Jot oil and skipping the gel phase for another batch to see if it stays a bit more vibrant than this. Oh, and the volcano was cool, we have never had that happen before!


Yellow Dock Root Powder

The yellow dock root soap was disappointing. After reading online about the beautiful raspberry reds that some people were getting with this natural colorant, we were hoping to get a better color. Instead, the top of this soap is a faint light raspberry pink while the inside turned slightly yellow (you can't really see the yellow in the picture but it is there). Hopefully the color will change over time. In the meantime, we have plans to strengthen our yellow dock root infusion and use a higher percentage in the batch next time. We are determined to get that raspberry red! 


We have some indigo, safflower petals, red clay, madder root and alkanet root on the way to experiment with next time so stay tuned!

Sunday 4 September 2011

Fight Club!

Ancient people found their clothes got clean when they washed them at a certain point in the river. You know why?
No.
Becuase human sacrifices were once made on the hills above this river, bodies burned, water seeped through the wood and ashes to create lye, this is lye,

the crucial ingredient. Once it mixed with the melted fat of the bodies, a thick white soapy discharge crept into the river. Let me see your hand please…
what is this?...
This is a chemical burn…
(Quoted from the movie Fight Club…we have no idea if this is really true)
Ok, we won’t show you the picture right away, we’ll give fair warning to the squeamish first.
On Fight Club, they make soap out of human fat! Ew! Well, don’t worry, that’s not what we do. But we do use the same process!
Remember the scene where Brad Pit kisses/spits on Edward Norton’s hand and pours lye on it?! (quoted above)…then Norton’s hand starts to sizzle? Well, we can learn something from this movie; it’s not just for entertainment. Well, maybe it was but the teacher in me can pull something educational from ANYTHING!
Anyways, if you are squeamish, do not look at the picture below because I am about to show you what it looks like to be burned by lye (NaOH), a chemical used to make soap.
Let me give you some space to scroll down and prepare yourself…
There, you have had fair warning. This is what it looks like to be burned by lye.

Ok, maybe that was anticlimactic but there are far worse pictures if you google it and they were way to gross to post. Look up 'Lye Burn' and you'll know.

So, let us tell you about safety while making soap. We wear a lot of safety gear when making soap. Take a look:

What are we wearing? Well, we make sure we have the smallest amount of exposed skin possible. We wear large, long sleeved, button up shirts with the collar turned up, aprons, pants…not shorts, socks and shoes, nitrile gloves, safety goggles, and painter’s masks.
We also keep a spray bottle of vinegar nearby just in case we get lye on our bare skin to neutralize the burn. (This is how Pit neutralizes the burn on Norton’s hand)
Why do we wear safety goggles when we already have glasses? If you splash lye onto your glasses it will eat through whatever coating you have on your glasses and you will either have to live with permanent spots on your glasses or get new lenses. We're speaking from experience on this one. Also, what if you splashed your face and it dripped into your eye? …Hm, I don’t really want to think about that…*shudder*
So what have you learned from the Soap Sisters today? Yes, that’s right, don’t show any skin! Not only is showing too much skin inappropriate for young people, but you could get HORRIBLY BURNED.